Add a FeedCount in your blog
Posted On Saturday, August 29, 2009 at at 1:13 AM by RashedDo you want to add a FeedCount in your blog?. It is amazing. I have made it. You can also. To add a FeedCount follow the steps.
- Go to www.feedburner.google.com
- Sign in, if you do not understand how to sign in then read this article, FeedBurner sign in process
- Click Publicize
- Select "Chicklet style" and color
- Then click "Activate"
- Find out "Use as a widget in" and select "Blogger" from the drop down menu.
- Then copy the HTML code for the counter and Click Save
- Then go to your blogger Dashboard
- Click Add a Gadget and Then select "HTML/JavaScript"
- Paste the HTML code and Save
- You have finished
Add an Headline Animator in Your Blog
Posted On Saturday, August 1, 2009 at at 12:54 AM by RashedHeadline Animator is good to look and a blogger always try make the site good to look. Headline Animator shows about 5-6 headlines and if any user click on a Headline then he is able to see the page. To add a Headline Animator, follow the instruction
- Go to http://feedburner.google.com (It was www.feedburner.com)
- Sign up and then Log in
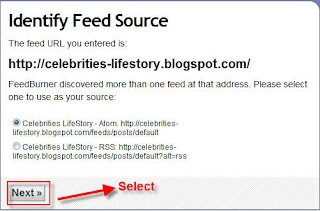
- Copy your website/ Blogsite url and paste in "Burn a feed right this instant. Type your blog or feed address here:"
- Select "Next"
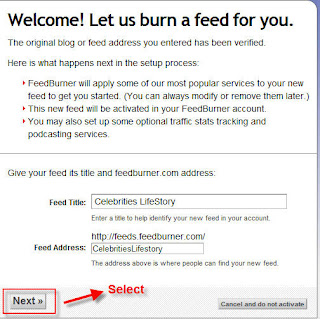
- A new page will appear. Just select "Next"
- A new page will open. Just select"Next"
- Then select "Skip directly to feed management"
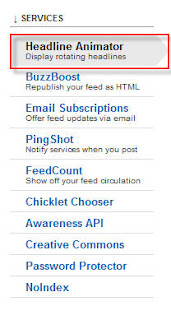
- Select "Publicize"
- Select "Headline Animator"
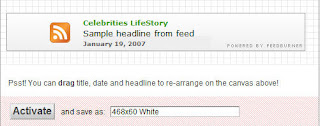
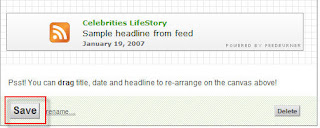
- You may edit your Headline Animator. After Editing select "Activate"
- Then select "Save"
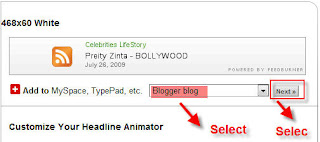
- Then choose "Blogger blog" and "Next"
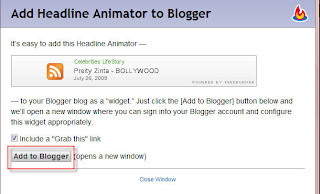
- A new window will open. Select "Add to Blogger"
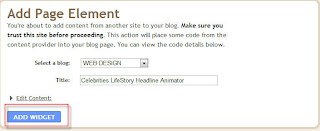
- Then a new window will open. Select "ADD WIDGET"
- You have finished. You may change the placement of your Headline Animator from your Layout



Add an Email Subscription in your Blog
Posted On Tuesday, July 28, 2009 at at 1:13 AM by RashedIt is good to add an email subscription in your blog. Almost every popular bloggers' site has email subscription option and it is good for blogging. Your site may rich with a lot of good articles. User my like them. But within tons of site they may forget your site's url or not always like to visit your site regularly because you may not updated that regularly. So let them a choice. Put an email subscription option and let them subscribe. As a result whenever you post an article they will get it without visiting your site. It is also a way to get connected with your user.
Process of adding email subscription:
- Go to http://www.feedburner.com/
- Sign Up
- Then go to again FeedBurner and Put your sites's URL and click next
- Click Next
- Click Active Feed

- Click Skip directly to feed management ( you may like to click next if you want to know about some other service)
- Click Publicize
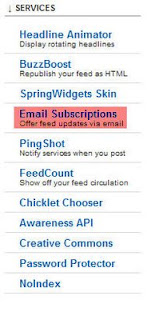
- Click Email Subscriptions
- Click Activate
- Select Language As English and Use as a widget in Blogger (see image, please). Copy the code and save
- To add email subscription in your blog; Go to Dashboard >> Layout >> Page Elements >> Add a Gadget >> HTML/JavaScript
- Then Paste the Code and Save




Add a Chat Box in Your Blogsite
Posted On at at 1:02 AM by RashedChat box is suitable for blogging site. It let the users to share their feelings and user can make funs. Sometimes they left some important informations about the site. So, blogger should add a chat box for the user. To add a chat box:
- Go to :http://www.cbox.ws/
- Sign Up
- Then after completing youe sign up process, Log in the site with your Name and Password
- Then Create your chat box. You may give a name your chatbox, change the lookings of the chatbox from "Publish! Look & Feel Options Users & Access Messages" options from the header part of the site. Make it suitable for your site and publish it.
- Then Copy the Code
- Go to your blog Dashboard or Sign in
- Then Go to Layout > > Page Elements > > Add a Gadget > > HTML/JavaScript
- Paste your ChatBox Code
- Save
You Have Finished
JavaScript-program 2
Posted On Friday, June 12, 2009 at at 12:21 AM by RashedJavaScript is not work in all browsers. These browsers do not show
all the elements or writings within the <Script>.......</Script>
. So to make JavaScript usefull for all browsers, we have to use non script tag.
The non script tag is <!--begin hiding Javascript
and it is end with //End hiding JavaScript--> .
Actually it is comment code that hide the JavaScript from the browsers
those do not support JavaScript. Browsers that support the JavaScript language just ignore the Comment.
You can only use <!-- and end the code as //-->
Here is the Total code:
<html>
<head>
<title>JavaScript</title>
</head>
<body>
<Script Language="JavaScript">
<!--Begin hiding JavaScript
document.write("Welcome to Java World")
//End hiding JavaScript-->
</Script>
</body>
</html>
JavaScript-program 1
Posted On at at 12:17 AM by RashedHow to use JavaScript?
In the introductory post of JavaScript language, I write about
how to write the JavaScript language. Here is an elaborated part
of that post.
<html>
<head>
<title>JavaScript</title>
</head>
<body>
<Script Language="JavaScript">
document.write("Welcome to Java World")
</Script>
</body>
</html>
- Explanation
- <Script Language="JavaScript"> is used for creating JavaScript
environment. Actually it is the start of JavaScript lanuage - document.write("Welcome to Java World")
document.write is used for writing anything with JavaScript.
The syntax isdocument.write("......."). Write anything within the brackets. - There is another syntax that is used to write in JavaScript. This is
document.writeln("......."). (writeln is for write line) - </Script> is used to close the JavaScript
JavaScript
Posted On at at 12:13 AM by RashedJavaScript is developed from Java and it is more simpler than Java language.
We can use JavaScript to design webpage. JavaScript is used within HTML language.
To write JavaScript follow the following steps:
- Open NotePad or WordPad
- Write
<html>
<head>
<title>JavaScript</title>
</head>
<body>
<Script Language="JavaScript">
document.write("Welcome to Java World")
</Script>
</body>
</html> - Then Save it as JavaScript.html. Remember you have to save the program with .html extension
Animated Flash Tag Cloud For Blogger
Posted On Thursday, June 11, 2009 at at 12:29 AM by RashedFlash Tag Cloud is a cool widget. It changes the look of your Blog. It is generally known as "Blogumus"and "Blogumus" is an Flash based tag cloud widget which uses scripts converted from Roy Tanck's WP Cumulus plugin for Wordpress. There are several Difficult methods, you will find, to add it in blog. Here is how I add this in my blog.
To add Blogumus or flash Tag Cloud, follow this steps.
- Go to your Dashboard >>Layout >> Edit HTML
- Check Expand Widget Templates From the right corner of HTML code textarea
- Find out<b:section class='sidebar' id='sidebar' preferred='yes'>
Important notes:
The above code you may not find in your template code as I did not find out the exact code. Actually it is the code of column of your template. You have to find out where you want to see your Tag Cloud. If you want to see your Tag Cloud in the right column in your blog template then you have to find out the code of Right column. Column code code is not same for all template because each template designer named his template's column differently. The common Code is <div class='sidebar' id='sidebar-left'><b:section class='side' id='sidebar1' preferred='yes'> It is my template code. So please find out something like: <b:section class='...' id='.....' preferred='...'>. - Just after the code copy and paste the following code:<b:widget id='Label99' locked='false' title='Labels' type='Label'>
<b:includable id='main'>
<b:if cond='data:title'>
<h2><data:title/></h2>
</b:if>
<div class='widget-content'>
<script src='http://halotemplates.s3.amazonaws.com/wp-cumulus-example/swfobject.js' type='text/javascript'/>
<div id='flashcontent'>Blogumulus by <a href='http://www.roytanck.com/'>Roy Tanck</a> and <a href='http://www.bloggerbuster.com'>Amanda Fazani</a></div>
<script type='text/javascript'>
var so = new SWFObject("http://halotemplates.s3.amazonaws.com/wp-cumulus-example/tagcloud.swf", "tagcloud", "240", "300", "7", "#ffffff");
// uncomment next line to enable transparency
//so.addParam("wmode", "transparent");
so.addVariable("tcolor", "0x333333");
so.addVariable("mode", "tags");
so.addVariable("distr", "true");
so.addVariable("tspeed", "100");
so.addVariable("tagcloud", "<tags><b:loop values='data:labels' var='label'><a expr:href='data:label.url' style='12'><data:label.name/></a></b:loop></tags>");
so.addParam("allowScriptAccess", "always");
so.write("flashcontent");
</script>
<b:include name='quickedit'/>
</div>
</b:includable>
</b:widget> - Preview your Template and then Save Template
If you want to change the Height and Width then change this parameter:
- Width is set to 240px
- Height is set to 300px;
- Background color is white
- Test color is Grey
- Font size is "12"
Again:
If you face any trouble, Then I'm interested to hear you friends.You will not see the Tag Cloud if you have not installed the Flash Player. You can see the Tag Cloud in the Top Right Corner of my blog.
Add a "Site Search" option in your Blog
Posted On Monday, June 8, 2009 at at 1:37 AM by RashedSite search option is friendly for the users. They Can easily find out their topics through searching the site. The process of adding site search is:
- Go to Dashboard
- Then Layout >> Page Elements And then Add a Gadget
- Click HTML/JavaScript
- Copy and Paste the codes:
<form id="searchThis" action="/search" style="display:inline;" method="get"><input id="searchBox" name="q" type="text"/> <input id="searchButton" value="Go" type="submit"/></form> - Save it
You Have Finished
How to add Reaction widget in your blog?
Posted On Saturday, June 6, 2009 at at 3:17 AM by RashedTo add a reaction widget follow these steps:
- Go to Layout
- Then Edit HTML
- Check Expand Widget Templates
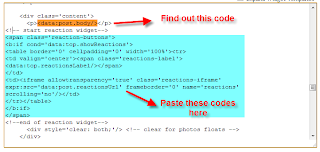
- Find out this code: <data:post.body/>
- Just after this code paste the following codes:
<span class='reaction-buttons'>
<b:if cond='data:top.showReactions'>
<table border='0' cellpadding='0' width='100%'><tr>
<td valign='center'><span class='reactions-label'>
<data:top.reactionsLabel/></span>
</td>
<td><iframe allowtransparency='true' class='reactions-iframe' expr:src='data:post.reactionsUrl' frameborder='0' name='reactions' scrolling='no'/></td>
</tr></table>
</b:if>
</span>
You have finished.
It will look like this:

HTML-program 23
Posted On Saturday, May 23, 2009 at at 12:19 AM by RashedProgram 23:
<html>
<head>
<title>Table</title>
</head>
<body>
<a href="http://easy-webpage-design.blogspot.com"> web design</a>
</body>
</html>
- Explanation:
- <a href="......"> is used to make hyperlink
- To make a web hyperlink, use http:// before the web address
HTML-program 22
Posted On at at 12:14 AM by RashedProgram 22:
<html>
<head>
<title>Table</title>
</head>
<body>
<table border="5" width="250" height="50" align="center" bgcolor="red" bordercolor="green" rules="all" frame="above">
<tr>
<td>Name</td> <td>Roll</td><td>CGPA</td>
</tr>
<tr>
<td>Rashed</td><td>050620</td><td>3.63</td>
</tr>
<tr>
<td>Reza</td><td>050621</td><td>3.25</td>
</tr>
</table>
</body>
</html>
HTML-program 21
Posted On Wednesday, May 20, 2009 at at 1:41 AM by RashedProgram 21:
<html>
<head>
<title>meta</title>
<meta name="description" content="your site's description. 2-3 sentences are better"/>
<meta name="keywords" content="your keywords, separated by commas"/>
<meta name="distribution" content="global"/>
<meta name="revisit" content="1 day"/>
<meta name="revisit-after" content="1 day"/>
<meta name="resource-type" content="document"/>
<meta name="audience" content="all"/>
<meta name="rating" content="general"/>
<meta name="robots" content="all"/>
<meta name="robots" content="index, follow"/>
<meta name="author" content="your name/company"/>
<meta name="language" content="en"/>
</head>
<body>
Meta tag is used for to describe a website content with only two or three words or sentence. It is very much important for any website because generally after seeing meta description or meta, user generally enter the website. In a search engine, sentences or words between the Title and Url are meta.
</body>
</html>
- Note:
- meta is not displayed in website but it is displayed in search engine.
HTML-program 20
Posted On at at 1:40 AM by RashedProgram 20:
<html>
<head>
<title>meta</title>
<META name="keywords" content="META TAG,SEO,Process of adding meta tag etc"/>
</head>
<body>
Meta tag is used for to describe a website content with only two or three words or sentence. It is very much important for any website because generally after seeing meta description or meta, user generally enter the website. In a search engine, sentences or words between the Title and Url are meta.
</body>
</html>
- Note:
- meta is not displayed in website but it is displayed in search engine.
- <META name="Description" content="Add meta tag in your site and it will
increase your traffic, here you will get the process of adding meta tag"/> (another meta attributes). Use one type, not both type.
HTML-program 19
Posted On at at 1:36 AM by RashedProgram 19:
<html>
<head>
<title>marquee</title>
</head>
<body>
<marquee>code to simple scrolling text</marquee><br>
<marquee bgcolor="#0000ff">code to simple scrolling text</marquee><br>
<hr><p>
<marquee behavior="alternate" direction="down" bgcolor="#0000ff">code to simple scrolling text</marquee><br>
</p>
<hr><p>
<marquee behavior="alternate" direction="left" bgcolor="#0000ff" scrollamount="2">code to simple scrolling text</marquee><br>
</p><hr><p>
<marquee behavior="alternate" direction="left" bgcolor="#0000ff" scrollamount="8">code to simple scrolling text</marquee><br>
</p><hr><p>
<marquee behavior="alternate" direction="left" bgcolor="#0000ff" onmouseover="this.stop()" onmouseout="this.start()" scrollamount="2" scrolldelay="50"> code to simple scrolling text</marquee><br>
</p><hr><p>
<span style="#ffffff"> <marquee onmouseover="this.stop()" onmouseout="this.start()" scrollamount="4" bgcolor="#0000ff"> <br /> <br />code to simple scrolling text<br /> <br /> </marquee></br>
</p><hr><p>
<marquee behavior="scroll" align="middle" direction="left" bgcolor="#0000ff" scrollamount="4" onmouseover="this.stop()" onmouseout="this.start()">
<br /> <br />
<a href=" http://blogging-for-bloggers.blogspot.com">Blogging</a>
<a href=" http://shortmemory-shorttime.blogspot.com">short memory</a>
<a href=" http://makemoneyonliine.blogspot.com"> Make Money Online </a>
<br /> <br /> </marquee><br>
</p><hr><p>
<marquee behavior="scroll" direction="left" bgcolor="#0000ff" onmouseover="this.stop()" onmouseout="this.start()" scrollamount="4">
<a href=" http://blogging-for-bloggers.blogspot.com">Blogging</a>
<a href=" http://shortmemory-shorttime.blogspot.com">short memory</a>
<a href=" http://makemoneyonliine.blogspot.com"</a>
<br /> <br /> </marquee><br>
</body>
</html>
- Note:
- To make the text scroll, <marquee> tag is used. It has many attributes. See the attributes carefully and its effects.
- It will look like:
HTML-program 18
Posted On at at 1:35 AM by RashedProgram 18:
<html>
<head>
<title>margin</title>
</head>
<body background="rashed01.jpg" text="yellow" bgproperties="fixed" topmargin="60" leftmargin="60">
<dl> <!--dl is definition list-->
<h1><dt>Computer</h1>
<dd>Computer is a computing machine.
<h1><dt>school</h1>
<dd>School is an organisation where different branches of knowledge are taught.
</dl>
</body>
</html>
- Note:
- We can fix Top margin, Bottom margin, Left margin, Right margin of the page as we like.
HTML-program 17
Posted On at at 1:34 AM by RashedProgram 17:
<html>
<head>
<title>background</title>
</head>
<body background="rashed01.jpg" text="yellow" bgproperties="fixed">
<dl> <!--dl is definition list-->
<h1><dt>Computer</h1>
<dd>Computer is a computing machine.
<h1><dt>school</h1>
<dd>School is an organisation where different branches of knowledge are taught.
</dl>
</body>
</html>
- IMPORTANT NOTES:
- Image is also used in body background. To use image as the body background, you have to keep the image in the same folder where you are working.
- Image URL can be also used as background. Just paste the URL instead of rashedo1.jpg.
HTML-program 16
Posted On at at 1:33 AM by RashedProgram 16:
<html>
<head>
<title>background</title>
</head>
<body bgcolor="red" text="yellow">
<dl>
<h1><dt>Computer</h1>
<dd>Computer is a computing machine.
<h1><dt>school</h1>
<dd>School is an organisation where different branches of knowledge are taught.
</dl>
</body>
</html>
- Explanation:
- <body> itself has some attributes as bgcolor (background color), text (body text color) etc.
HTML-program 15
Posted On at at 1:31 AM by RashedProgram 15:
<html>
<head>
<title>Definition
</title>
</head>
<body>
<dl> <!--dl is definition list-->
<h1><dt>Computer</h1>
<dd>Computer is a computing machine.
<h1><dt>school</h1>
<dd>School is an organisation where different branches of knowledge are taught.
</dl>
</body>
</html>
- Explanation:
- To define different words or terms <dl> is used. dl means definition list. It contains two attributes <dt> and <dd>. dt for definition term and dd for definition description.
- It will look like:
- Computer
- Computer is a computing machine.
- school
- School is an organisation where different branches of knowledge are taught.
HTML-program 14
Posted On at at 1:29 AM by RashedProgram 14:
<html>
<head>
<title>This is my first webpage</title>
</head>
<body>
<ol>
<li>book</li>
<li>khata</li>
<li>pen</li>
<li>pencil</li>
</ol>
<ul>
<li>book</li>
<li>khata</li>
<li>pen</li>
<li>pencil</li>
</ul>
<ol start="6">
<li>book</li>
<li>khata</li>
<li>pen</li>
<li>pencil</li>
</ol>
<ol type="a">
<li>book</li>
<li>khata</li>
<li>pen</li>
<li>pencil</li>
</ol>
<ol type="1">
<li>book</li>
<li>khata</li>
<li>pen</li>
<li>pencil</li>
</ol>
<ol type="a">
<li>book</li>
<ol type="1"><li>Bangla</li>
<li>English</li>
<li>Math</li></ol>
<li>khata</li>
<li>pen</li>
<li>pencil</li>
</ol>
<ul>
<li>Book</li>
<ol><li>Bangla</li>
<li>English</li>
<li>Math</li>
</ol>
<li>Khata</li>
<li>pen</li>
<li>pencil</li>
</ul>
</body>
</html>
- Explanation:
- To create order list <ol> is used. For each list <li> is used. List is closed with </li>. To close Order list </ol> is used.
- For Unorder list <ul> is used. For each list <li> is used. List is closed with </li>. To close Unorder list </ul> is used.
- Order list may be embeded within unorder list and vice versa.
- To make unorder list some other tag may be used as:
<menu>
<li>...</li>
<li>...</li>
</menu>
- or
<dir>
<li>.....</li>
<li>.......</li>
</dir>
- It will look like:
- book
- khata
- pen
- pencil
- book
- khata
- pen
- pencil
- book
- khata
- pen
- pencil
- book
- khata
- pen
- pencil
- book
- khata
- pen
- pencil
- book
- Bangla
- English
- Math
- khata
- pen
- pencil
- Book
- Bangla
- English
- Math
- Khata
- pen
- pencil
HTML-program 13
Posted On at at 1:27 AM by RashedProgram 13:
<html>
<head>
<title>This is my first webpage</title>
</head>
<body>
<h1 align="center">S.M. Rasheduzzaman</h1><br>
<p align="center">Khulna University</p>
<p align="center"> FMRT Discipline</p>
<hr align="center" width="50%">
<br><p>
<div align="center">
<h1>S.M. Rasheduzzaman</h1><br>
Khulna University<br>
FMRT Discipline
<hr width="50%">
</div>
</body>
</html>
- Explanation:
- <div> tag is used for division. We can divide the whole text into some divisions and fixed them with some attributes to avoid repeating of attributes and tag.
- It will look like:
S.M. Rasheduzzaman
Khulna University
FMRT Discipline
S.M. Rasheduzzaman
Khulna University
FMRT Discipline
HTML-program 12
Posted On at at 1:26 AM by RashedProgram 12:
<html>
<head>
<title>This is my first webpage</title>
</head>
<body>
<p>This is paragraph</p>
This is paragraph.<p>
<p align="center">This is paragraph.
<p align="right="This is paragraph.</p>
<p align="justify">
Whenever you are a seasoned HTML user or a first time, this
tutorial ments at your current level and helps you grow from there.
</body>
</html>
- Explanation:
- <p> tag is used for Paragraph. To start a paragraph <p> is used and to end </p> is used. Some attributes are used with it.
HTML-program 11
Posted On at at 1:21 AM by RashedProgram 11:
<html>
<head>
<title>This is my first webpage</title>
</head>
<body>
This is my first webpage. It is made with HTML.<br><hr></br>
<address>S.M. Rasheduzzaman.</br>
FMRT Discipline</br>
Khulna University<br>
Khulna, Bangladesh.</address>
<hr width="50%" color="red" align="left">
<hr width="20%" color="red" align="center">
<hr width="full" color="red" align="left">
</body>
</html>
- Explanation:
- <hr> is used for horizontal line. It has different attributes as height, width, color, align etc.
- <address> is used for writing address.
- It will look like:
This is my first webpage. It is made with HTML.
S.M. Rasheduzzaman.
FMRT Discipline
Khulna University
Khulna, Bangladesh.
(center align is not showing here correctly)
HTML-program 10
Posted On at at 1:14 AM by RashedProgram 10:
- <pre> tag:
<html>
<head>
<title>This is my first webpage</title>
</head>
<body>
<pre>This is
example of space. Normally in HTML there is single space between
two words but to create more space is used.</pre>
</body>
</html>
- Explanation:
- Sometimes some webmaster work in different text editor and then they copy and paste their text. As HTML makes text design itself, if we want to keep the text design as like the text editor, then <pre> tag is used. Sentences within <pre>..........</pre> tag will remain same as the text editor.
- It will look like:

HTML-program 9
Posted On at at 1:06 AM by RashedProgram 9:
<html>
<head>
<title>This is my first webpage</title>
</head>
<body>
This is example of space. Normally in HTML there is single space between two words but to create more space &nbsp; is used.
</body>
</html>
- Explanation:
- Normally in HTML there is single space between two words but is used to create more space
- It will look like:

HTML-program 8
Posted On at at 1:02 AM by RashedProgram 8:
- Alignment:
<html>
<head>
<title>This is my first webpage</title>
</head>
<body>
<h1 align="left">This is H1</h1><br>
<h2 align="center">This is H2</h2><br>
<h3 align="right">This is H3</h3><br>
</body>
</html>
- HELPFUL TIPS:
- align attribute is also used wit <p>, <div> tag etc. So try it with different tags
- It will look like:

HTML-program 7
Posted On at at 12:59 AM by RashedProgram 7:
- Heading:
<html>
<head>
<title>This is my first webpage</title>
</head>
<body>
<h1>This is H1</h1><br>
<h2>This is H2</h2><br>
<h3>This is H3</h3><br>
<h4>This is H4</h4><br>
<h5>This is H5</h5><br>
<h6>This is H6</h6><br>
</body>
</html>
- It will look like:

HTML-program 6
Posted On at at 12:46 AM by RashedProgram 6:
- Some font style:
<html>
<head>
<title>This is my first webpage</title>
</head>
<body>
<blink>This is blink</blink><br>
<b>This is bold</b><br>
<i>This is italic</i><br>
<u>This is underline</u><br>
<cite>This is citation</cite><br>
<code>This is code style</code><br>
<em>This is emphasis style</em><br>
<s>This is strike through</s> or <strike>This is strike through</strike><br>
<strong> This is strong style</strong><br>
Here 2 is subscript: H<sub>2</sub>O<br>
Here 2 is superscript: (A+B)<sup>2</sup>=A<sup>2</sup>+B<sup>2</sup>+2AB<br>
<tt>It is Tele Type Style</tt><br>
<var>This is variable style</var><br>
This is normal.<big>This is Big</big><br>
This is normal. <small>This is small</small>
</body>
</html>
- It will look like:

HTML-program 5
Posted On at at 12:45 AM by RashedProgram 5:
- Font tag: <font>
<html>
<head>
<title> this is my first webpage</title>
</head>
<body>
<font color="red">This is my first webpage.</font><font face="Calibri"> This page is designed with HTML language.</font><br><font size="20">HTML language is the principle language for web design but other language like</font><br> php, Java, JavaScript, VB, VBScript etc are also used to design webpage.<br><font color="red" face="Calibri" size="20">But these language are used as embedded within HTML language.</font><br>So, HTML is the mother language of webpage design.
</body>
</html>
- Font attributes:
- Family: used in CSS, eg : arial, Calibri, times new roman
- face: Calibri
- Size: 2,4,4……../+2,+4,-1,-2,-4
- Color: red, green………/#ffffff, #ff00ff,……..
- Variant: small or capital
- Weight: normal, bold, bloder, lighter
etc.
- It will look like:

HTML-program 4
Posted On at at 12:41 AM by RashedProgram 4:
- Line break tag: <br>
<html>
<head>
<title> this is my first webpage</title>
</head>
<body>
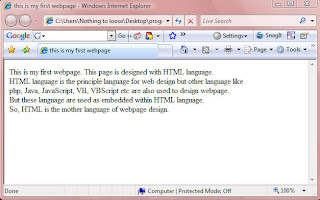
This is my first webpage. This page is designed with HTML language.<br>HTML language is the principle language for web design but other language like<br> php, Java, JavaScript, VB, VBScript etc are also used to design webpage.<br>But these language are used as embedded within HTML language.<br>So, HTML is the mother language of webpage design.
</body>
</html>
- Explanation:
- In HTML language, line or sentence is not break with "Enter key". To break a line <br/> or <br> or </br> tag is used. Otherwise, browser will break the line automatically.
- <br> tag is needs no closing tag. Or </br> or <br/> needs no starting tag. Any of these tag can be used.
- It will look like:
HTML-Body
Posted On at at 12:40 AM by RashedProgram 3:
<html>
<head>
<title> this is my first webpage</title>
</head>
<body>
This is my first webpage. This page is designed with HTML language.
</body>
</html>
- Explanation:
- Text within <body>.........</body> will be displayed in the browser. It is the main part of the web program.
- In this program "This is my first my first webpage. This page is designed with HTML language" will be displayed in the browser.
- It will look like:

HTML-Title
Posted On at at 12:30 AM by RashedProgram 2:
<html>
<head>
<title> this is my first webpage</title>
</head>
<body>
</body>
</html>
- Explanation:
- <head> contains <title> tag. Sentence within <title>.........</title> tag will be displayed in Title bar of the web browser.
- <head> also contains <meta> tag. <meta> tag will be discussed later.
It will look like:

HTML structure
Posted On at at 12:22 AM by RashedProgram 1:
HTML Structure:
<html>
<head>
</head>
<body>
</body>
</html>
- Explanation:
- HTML starts with <html>
- HTML has two parts, head and body
- Head starts with <head> and ends with </head>
- Body starts with <body> and ends with </body>
- HTML ends with </html>
HTML-Hyper Text Markup Language
Posted On at at 12:17 AM by RashedHTML
- To write HTML open a text editor.
- Write
<html>
<head>
<title>
</title>
</head>
<body>
</body>
</html>
- Explanation: HTML language starts with: <html>
- HTML language ends with : </html>
- HTML language contains two part: <head> and <body>
- <head> contains some tag like <title>, <meta> etc.
- <body> is the main part of html language. Web browser shows the <body>….. </body> part.
- / is used to close a tag. Within < > symbol tag and attributes are written.
- Almost every tag needs to end or close but some tags need not to close as <p> or <br>.
- Save the page with .html extension
Add a Chat Box
Posted On Wednesday, March 4, 2009 at at 2:33 AM by RashedChat box is suitable for blogging site. It let the users to share their feelings and user can make funs. Sometimes they left some important informations about the site. So, blogger should add a chat box for the user. To add a chat box:
- Go to :http://www.cbox.ws/
- Sign Up
- Then after completing youe sign up process, Log in the site with your Name and Password
- Then Create your chat box. You may give a name your chatbox, change the lookings of the chatbox from "Publish! Look & Feel Options Users & Access Messages" options from the header part of the site. Make it suitable for your site and publish it.
- Then Copy the Code
- Go to your blog Dashboard or Sign in
- Then Go to Layout > > Page Elements > > Add a Gadget > > HTML/JavaScript
- Paste your ChatBox Code
- Save
You Have Finished
If you like this article then post your comment and become a follower
Happy Blogging
Add Email Subscription in your Blog
Posted On Saturday, January 10, 2009 at at 2:13 AM by RashedIt is good to add an email subscription in your blog. Almost every popular bloggers' site has email subscription option and it is good for blogging. Your site may rich with a lot of good articles. User my like them. But within tons of site they may forget your site's url or not always like to visit your site regularly because you may not updated that regularly. So let them a choice. Put an email subscription option and let them subscribe. As a result whenever you post an article they will get it without visiting your site. It is also a way to get connected with your user.
- Go to FeedBurner
- Sign Up
- Then go to again FeedBurner and Put your sites's URL and click next
- Click Next
- Click Active Feed
- Click Skip directly to feed management ( you may like to click next if you want to know about some other service)
- Click Publicize
- Click Email Subscriptions
- Click Activate
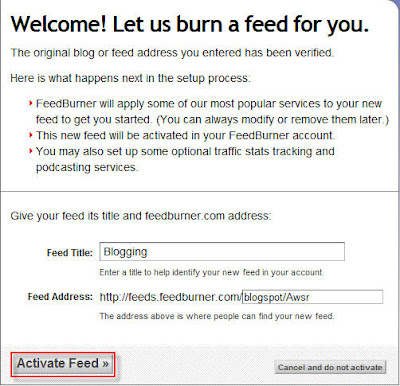
- Select Language As English and Use as a widget in Blogger (see image, please). Copy the code and save
- To add email subscription in your blog; Go to Dashboard >> Layout >> Page Elements >> Add a Gadget >> HTML/JavaScript
- Then Paste the Code and Save




Add Scrolling (marquee) Text-make a different look
Posted On Friday, January 9, 2009 at at 12:21 AM by RashedSimple Scrolling Text Code:
<marquee>code to simple scrolling text</marquee>
Example:
Change background color to the text:
<marquee bgcolor="#0000ff">code to simple scrolling text</marquee>
Example:
You Need More Color ! Here
350+ Color Code
You can change the direction of the scrolling text. The direction attributes are:
direction="left"
direction="right"
direction="up"
direction="down"
You can also change the scrolling style. The attribute is:
behavior="alternate"
behavior="scroll"
behavior="slide"
Write these code for direction and behavior:
<marquee behavior="alternate" direction="down" bgcolor="#0000ff">code to simple scrolling text</marquee>
Example of direction and behavior attribute:
Set the speed of the text. To do so, use this attribute:
scrollamount="2"
Example Code:
<marquee behavior="alternate" direction="left" bgcolor="#0000ff" scrollamount="2">code to simple scrolling text</marquee>
Example:
Another Example:
<marquee behavior="alternate" direction="left" bgcolor="#0000ff" scrollamount="8">code to simple scrolling text</marquee>
It will appear as:
Controll the text when mouse is over the text. The text will stop:
Example Code:
<marquee behavior="alternate" direction="left" bgcolor="#0000ff" onmouseover="this.stop()" onmouseout="this.start()" scrollamount="2" scrolldelay="50"> code to simple scrolling text</marquee>
Example:
Changing the text colour:
<span style="#ffffff">
or
<font clor="#ffffff">
Write these code:
<span style="#ffffff"> <marquee onmouseover="this.stop()" onmouseout="this.start()" scrollamount="4" bgcolor="#0000ff"> <br /> <br />code to simple scrolling text<br /> <br /> </marquee>
Example:
Make hyperlinks (open in the same window):
Example Code:
<marquee behavior="scroll" direction="left" bgcolor="#0000ff" onmouseover="this.stop()" onmouseout="this.start()" scrollamount="4">
<a href="url#1">LINK#1</a>
<a href="url#2">LINK#2</a>
<a href="url#3">LINK#3</a> </marquee>
NOTE:Replace the Link#1,Link#2,Link#3 with the text and url#1,url#2 and url#3 with the target
Example code:
<marquee behavior="scroll" align="middle" direction="left" bgcolor="#0000ff" scrollamount="4" onmouseover="this.stop()" onmouseout="this.start()">
<br /> <br />
<a href=" http://blogging-for-bloggers.blogspot.com">Blogging</a>
<a href=" http://shortmemory-shorttime.blogspot.com">short memory</a>
<a href=" http://makemoneyonliine.blogspot.com"> Make Money Online </a>
<br /> <br /> </marquee>
Example:
Open the links in new window,here is the code:
Example Code:
<marquee behavior="scroll" direction="left" bgcolor="#0000ff" onmouseover="this.stop()" onmouseout="this.start()" scrollamount="4">
<a href="url#1" target="_blank">LINK#1</a>
<a href="url#2" target="_blank">LINK#2</a>
<a href="url#3" target="_blank">LINK#3</a> </marquee>
NOTE:Replace the Link#1,Link#2,Link#3 with the text and url#1,url#2 and url#3 with the target
Example code:
<marquee behavior="scroll" direction="left" bgcolor="#0000ff" onmouseover="this.stop()" onmouseout="this.start()" scrollamount="4">
<a href=" http://blogging-for-bloggers.blogspot.com">Blogging</a>
<a href=" http://shortmemory-shorttime.blogspot.com">short memory</a>
<a href=" http://makemoneyonliine.blogspot.com"</a>
<br /> <br /> </marquee>
Example:
How to add scrolling text
- Go to your Dashboard > > Layout > > Page Elements > > Add a Gadget > > HTML/JavaScript
- Write your marquee code and save
It's all. Make a good look of your site. Happy Blogging.
Change Your Blog Template
Posted On Thursday, January 8, 2009 at at 12:16 AM by RashedI think most of the bloggers of blogger platform are not satisfied with bloggers' template. Most of them are unprofessional and not good looking. So you can change your template. Here is the process.
- Download template from internet. Search with "free blogger template". You may like to add "3 column blogger free template" or "3 column professional free blogger template". Download the template and save it in your hard drive
- Go to your Dashboard or sign in
- Go to Layout > > Edit HTML
- Download your template
- Then Click Choose File and choose your downloaded template and then click Upload
- Then there you will see a message that you are going to delete all your widget. Click Confirm and Save to change your template


You have finished. Happy blogging.
Add a Comment Box with Name, Email,URL and more
Posted On Wednesday, January 7, 2009 at at 1:56 AM by RashedYou may see it in many professional website or blog. A comment box with name, email, URL etc below the article. It is good for your user to make a user friendly good looking comment box. It will increase your traffic and good practice for SEO. (See SEO Tips). Here is the process through which you can make one.
Process Of Creating an Embeded Comment Box With Email, URL, Name field
- Go to creator.zoho
- Click Sign Up For Free
- Then in next page Click on Sign up again under Personal Free Edition
- Fill up the form and click Sign Up
- To activate your account you need to verify the link that is in your email account. Go to your email account and click the link to complete your account.
- Enter your password (that you used to sign up) and click Confirm
- Click Continue Signing In
- Then Sign In With your user name and password
- Then Click Zoho Creater from the list of services
- Create New Application
- Write "Specify Application Name:" and "Specify Form Name:" and click Create now
- We will use the Red selected items to create our comment box
- Drag Single Line in the box in right sight field and drop there. Then change the lebel name and write Name. Click Options to see more option. If you want it as a required field then Tick in the box. Otherwise left it and click Done.
- Then Drag and Drop Email and from the option Tick the Tick Box of "This is required field" and change the lebel name as Email and click Done
- Drag and Drop Multi line and change the lebel name as Comment and click done
- Then Click on More Actions and Form properties
- Change the success message, tick the verification code if you want and click Done
- Then Click Email Notification From the More Actions Dropdown Menu
- Enter your email account in To, Add a Subjects, Tick the Include user submitted data, Tick the Enabled radio button and click done.
- Click Access This Application
- Then Click Embed in Your Website from More Actions dropdown menu.
- From the header portion Click "Click here" to disable user login to Zoho and then copy the code
- You can paste this code in your website. If you want to paste in your blogger blog then go to Dashboard > > Layout > > Page elements > > Add Gadget > > HTML/JavaScript > > paste your code and Save. You can also paste it within your template.
- It Will look like:


If you like this article then subscribe with your email and get new article without visiting this site.
