Add an Headline Animator in Your Blog
Posted On Saturday, August 1, 2009 at at 12:54 AM by RashedHeadline Animator is good to look and a blogger always try make the site good to look. Headline Animator shows about 5-6 headlines and if any user click on a Headline then he is able to see the page. To add a Headline Animator, follow the instruction
- Go to http://feedburner.google.com (It was www.feedburner.com)
- Sign up and then Log in
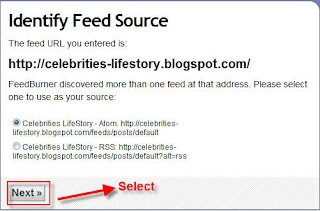
- Copy your website/ Blogsite url and paste in "Burn a feed right this instant. Type your blog or feed address here:"
- Select "Next"
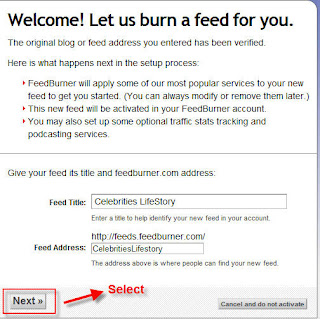
- A new page will appear. Just select "Next"
- A new page will open. Just select"Next"
- Then select "Skip directly to feed management"
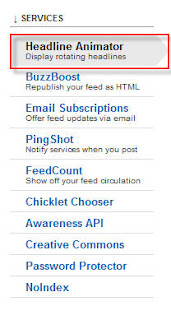
- Select "Publicize"
- Select "Headline Animator"
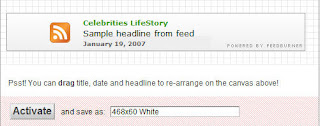
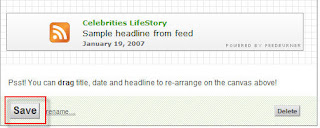
- You may edit your Headline Animator. After Editing select "Activate"
- Then select "Save"
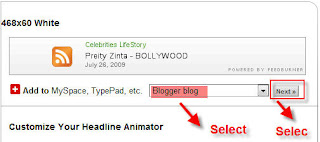
- Then choose "Blogger blog" and "Next"
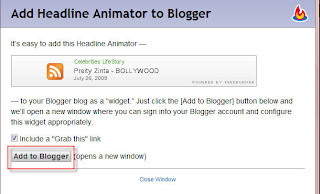
- A new window will open. Select "Add to Blogger"
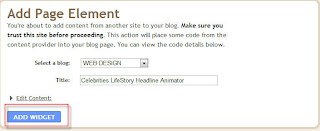
- Then a new window will open. Select "ADD WIDGET"
- You have finished. You may change the placement of your Headline Animator from your Layout



Animated Flash Tag Cloud For Blogger
Posted On Thursday, June 11, 2009 at at 12:29 AM by RashedFlash Tag Cloud is a cool widget. It changes the look of your Blog. It is generally known as "Blogumus"and "Blogumus" is an Flash based tag cloud widget which uses scripts converted from Roy Tanck's WP Cumulus plugin for Wordpress. There are several Difficult methods, you will find, to add it in blog. Here is how I add this in my blog.
To add Blogumus or flash Tag Cloud, follow this steps.
- Go to your Dashboard >>Layout >> Edit HTML
- Check Expand Widget Templates From the right corner of HTML code textarea
- Find out<b:section class='sidebar' id='sidebar' preferred='yes'>
Important notes:
The above code you may not find in your template code as I did not find out the exact code. Actually it is the code of column of your template. You have to find out where you want to see your Tag Cloud. If you want to see your Tag Cloud in the right column in your blog template then you have to find out the code of Right column. Column code code is not same for all template because each template designer named his template's column differently. The common Code is <div class='sidebar' id='sidebar-left'><b:section class='side' id='sidebar1' preferred='yes'> It is my template code. So please find out something like: <b:section class='...' id='.....' preferred='...'>. - Just after the code copy and paste the following code:<b:widget id='Label99' locked='false' title='Labels' type='Label'>
<b:includable id='main'>
<b:if cond='data:title'>
<h2><data:title/></h2>
</b:if>
<div class='widget-content'>
<script src='http://halotemplates.s3.amazonaws.com/wp-cumulus-example/swfobject.js' type='text/javascript'/>
<div id='flashcontent'>Blogumulus by <a href='http://www.roytanck.com/'>Roy Tanck</a> and <a href='http://www.bloggerbuster.com'>Amanda Fazani</a></div>
<script type='text/javascript'>
var so = new SWFObject("http://halotemplates.s3.amazonaws.com/wp-cumulus-example/tagcloud.swf", "tagcloud", "240", "300", "7", "#ffffff");
// uncomment next line to enable transparency
//so.addParam("wmode", "transparent");
so.addVariable("tcolor", "0x333333");
so.addVariable("mode", "tags");
so.addVariable("distr", "true");
so.addVariable("tspeed", "100");
so.addVariable("tagcloud", "<tags><b:loop values='data:labels' var='label'><a expr:href='data:label.url' style='12'><data:label.name/></a></b:loop></tags>");
so.addParam("allowScriptAccess", "always");
so.write("flashcontent");
</script>
<b:include name='quickedit'/>
</div>
</b:includable>
</b:widget> - Preview your Template and then Save Template
If you want to change the Height and Width then change this parameter:
- Width is set to 240px
- Height is set to 300px;
- Background color is white
- Test color is Grey
- Font size is "12"
Again:
If you face any trouble, Then I'm interested to hear you friends.You will not see the Tag Cloud if you have not installed the Flash Player. You can see the Tag Cloud in the Top Right Corner of my blog.
Add Email Subscription in your Blog
Posted On Saturday, January 10, 2009 at at 2:13 AM by RashedIt is good to add an email subscription in your blog. Almost every popular bloggers' site has email subscription option and it is good for blogging. Your site may rich with a lot of good articles. User my like them. But within tons of site they may forget your site's url or not always like to visit your site regularly because you may not updated that regularly. So let them a choice. Put an email subscription option and let them subscribe. As a result whenever you post an article they will get it without visiting your site. It is also a way to get connected with your user.
- Go to FeedBurner
- Sign Up
- Then go to again FeedBurner and Put your sites's URL and click next
- Click Next
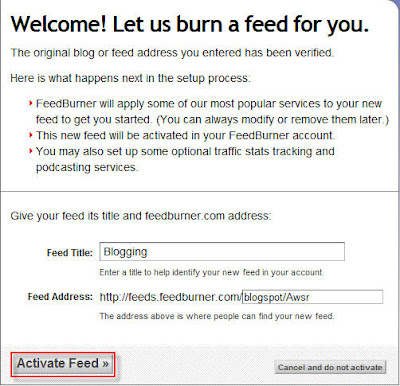
- Click Active Feed
- Click Skip directly to feed management ( you may like to click next if you want to know about some other service)
- Click Publicize
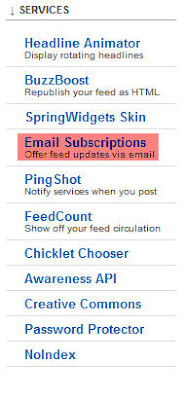
- Click Email Subscriptions
- Click Activate
- Select Language As English and Use as a widget in Blogger (see image, please). Copy the code and save
- To add email subscription in your blog; Go to Dashboard >> Layout >> Page Elements >> Add a Gadget >> HTML/JavaScript
- Then Paste the Code and Save






Add All Posts Widget or Table Of Content Widget
Posted On Friday, December 26, 2008 at at 4:06 PM by RashedIf you are a blogger and you are blogging for a long time then you will find that your site is carrying a lot of pages with a lot of title. The lebel gadget or recent posts are not displaying all the articles name. It will be better for your user if they can see your all posts. You can sort the TOC by Post Title by clicking the column header. Click it again, and it is sorted in reversed order. The same way if you want to sort the posts by date: newest first, or oldest first. And by clicking on one of the labels in the TOC filters all posts with that label. Click the column header to return to the full TOC. I think it is good for SEO and it will increase your traffic because it will make your site user friendly.
Here is how to install it to your Blog.
- Back Up your Template.
- Add a HTML Page Element
- Go to Layout < < Add a gadget and then Add a HTML page element above your Blog Posts element.
Leave the title blank. Add the following html: - Save your template.
- Add a Sidebar HTML-element
- Add custom styles to the skin of your template.
- For your convenience: Beautiful Beta uses the following styling:

Edit your template in HTML-mode, and look for the <b:section> with id=main. This is the section that holds the Blog posts.

Change that line as follows:
<b:section class='main' id='main' maxwidgets='2' showaddelement='yes'>

Save the template and switch to the Page Elements Tab.


<div id="toc"></div>

Now add a HTML-element to the sidebar. Set the title to "TOC".
For the contents, enter:
<div id="toclink"><a href="javascript:showToc();">Show TOC</a><br/><br/></div><script style="text/javascript" src="http://home.planet.nl/~hansoosting/downloads/blogtoc.js"></script><script src="http://YOURBLOG.blogspot.com/feeds/posts/default?alt=json-in-script&max-results=999&callback=loadtoc"></script>
Replace YOURBLOG with the name of Your Site's URL...... exactly.
Oh yes, and save.
New id's and classes are:
#toc : the div-wrapper that contains the TOC
.toc-header-col1 : header of column 1
.toc-header-col2 : header of column 2
.toc-header-col3 : header of column 3
.toc-entry-col1 : cell in column 1
.toc-entry-col2 : cell in column 2
.toc-entry-col3 : cell in column 3
<style type="text/css">#toc { border: 0px solid #000000; background: #ffffff; padding: 5px; width:500px; margin-top:10px;}.toc-header-col1, .toc-header-col2, .toc-header-col3 { background: #ffd595; color: #000000; padding-left: 5px; width:250px;}.toc-header-col2 { width:75px;}.toc-header-col3 { width:125px;}.toc-header-col1 a:link, .toc-header-col1 a:visited, .toc-header-col2 a:link, .toc-header-col2 a:visited, .toc-header-col3 a:link, .toc-header-col3 a:visited { font-size:80%; text-decoration:none;}.toc-header-col1 a:hover, .toc-header-col2 a:hover, .toc-header-col3 a:hover { font-size:80%; text-decoration:underline;}.toc-entry-col1, .toc-entry-col2, .toc-entry-col3 { padding-left: 5px; font-size:70%;}</style> |
You can add this code to the <b:skin>-part of the template, or insert it in the sidebar widget.
Add Label Cloud
Posted On at at 3:26 PM by RashedTo add a lebel cloud flow this process:
- Go to your Dashboard
- Select Layout
- G to Edit HTML
- Find out this code:
]]></b:skin> And Place Below Code In place of ]]></b:skin>(By Removing ]]></b:skin>)
/* Label Cloud Styles
----------------------------------------------- */
#labelCloud {text-align:center;font-family:arial,sans-serif;}
#labelCloud .label-cloud li{display:inline;background-image:none !important;padding:0 5px;margin:0;vertical-align:baseline !important;border:0 !important;}
#labelCloud ul{list-style-type:none;margin:0 auto;padding:0;}
#labelCloud a img{border:0;display:inline;margin:0 0 0 3px;padding:0}
#labelCloud a{text-decoration:none}
#labelCloud a:hover{text-decoration:underline}
#labelCloud li a{}
#labelCloud .label-cloud {}
#labelCloud .label-count {padding-left:0.2em;font-size:9px;color:#000}
#labelCloud .label-cloud li:before{content:"" !important}
]]></b:skin>
<script type='text/javascript'>
// Label Cloud User Variables
var cloudMin = 1;
var maxFontSize = 20;
var maxColor = [0,0,255];
var minFontSize = 10;
var minColor = [0,0,0];
var lcShowCount = false;
</script> - Save your template
- Go to Edit HTML and Find these code:
- Atlast replace the above mention Label1 widget code with below code:
<b:widget id=’Label1′ locked=’false’ title=’Labels’ type=’Label’/>
(if you don't find it then go to page element and add a Lebel Gadget from add a gadget)
<b:widget id='Label1' locked='false' title='Label Cloud' type='Label'> <b:includable id='main'> <b:if cond='data:title'> <h2><data:title/></h2> </b:if> <div class='widget-content'> <div id='labelCloud'/> <script type='text/javascript'> // Don't change anything past this point ----------------- // Cloud function s() ripped from del.icio.us function s(a,b,i,x){ if(a>b){ var m=(a-b)/Math.log(x),v=a-Math.floor(Math.log(i)*m) } else{ var m=(b-a)/Math.log(x),v=Math.floor(Math.log(i)*m+a) } return v } var c=[]; var labelCount = new Array(); var ts = new Object; <b:loop values='data:labels' var='label'> var theName = "<data:label.name/>"; ts[theName] = <data:label.count/> </b:loop> for (t in ts){ if (!labelCount[ts[t]]){ labelCount[ts[t]] = new Array(ts[t]) } } var ta=cloudMin-1; tz = labelCount.length - cloudMin; lc2 = document.getElementById('labelCloud'); ul = document.createElement('ul'); ul.className = 'label-cloud'; for(var t in ts){ if(ts[t] < cloudMin){ continue; } for (var i=0;3 > i;i++) { c[i]=s(minColor[i],maxColor[i],ts[t]-ta,tz) } var fs = s(minFontSize,maxFontSize,ts[t]-ta,tz); li = document.createElement('li'); li.style.fontSize = fs+'px'; li.style.lineHeight = '1'; a = document.createElement('a'); a.title = ts[t]+' Posts in '+t; a.style.color = 'rgb('+c[0]+','+c[1]+','+c[2]+')'; a.href = '/search/label/'+encodeURIComponent(t); if (lcShowCount){ span = document.createElement('span'); span.innerHTML = '('+ts[t]+') '; span.className = 'label-count'; a.appendChild(document.createTextNode(t)); li.appendChild(a); li.appendChild(span); } else { a.appendChild(document.createTextNode(t)); li.appendChild(a); } ul.appendChild(li); abnk = document.createTextNode(' '); ul.appendChild(abnk); } lc2.appendChild(ul); </script> <noscript> <ul> <b:loop values='data:labels' var='label'> <li> <b:if cond='data:blog.url == data:label.url'> <data:label.name/> <b:else/> <a expr:href='data:label.url'><data:label.name/></a> </b:if> (<data:label.count/>) </li> </b:loop> </ul> </noscript> <b:include name='quickedit'/> </div> </b:includable> </b:widget> |
You have finished
Add Recent Posts Widget
Posted On at at 5:30 AM by RashedCreate Recent Posts Widget. It will help your reader. They will able to know the recent posts. Follow the process to Get the Recent Posts widget.
- Sign in your site ant go to layout>>Page Elements>>Add a Gadget.
- Select HTML/Javascript
- Copy and paste these codes:<script style="text/javascript" src="http://scraptoall.googlepages.com/recentposts.js"></script><script style="text/javascript">var numposts = 10;var showpostdate = false;var showpostsummary = false;var numchars = 100;var standardstyling = true;</script><script src="http://shortmemory-shorttime.blogspot.com/feeds/posts/default?orderby=published&alt=json-in-script&callback=showrecentposts"></script>
- Change the url ("http://shortmemory-shorttime.blogspot.com/) and write your site's URL
- Save the gadget.
