Add an Headline Animator in Your Blog
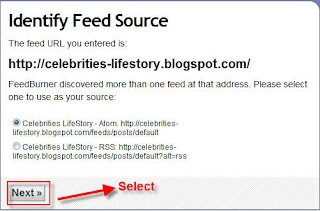
Posted On Saturday, August 1, 2009 at at 12:54 AM by RashedHeadline Animator is good to look and a blogger always try make the site good to look. Headline Animator shows about 5-6 headlines and if any user click on a Headline then he is able to see the page. To add a Headline Animator, follow the instruction
- Go to http://feedburner.google.com (It was www.feedburner.com)
- Sign up and then Log in
- Copy your website/ Blogsite url and paste in "Burn a feed right this instant. Type your blog or feed address here:"
- Select "Next"
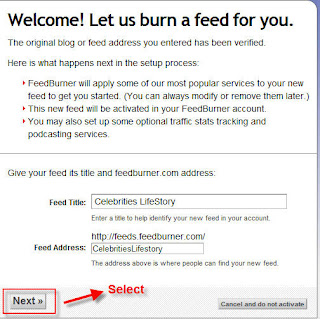
- A new page will appear. Just select "Next"
- A new page will open. Just select"Next"
- Then select "Skip directly to feed management"
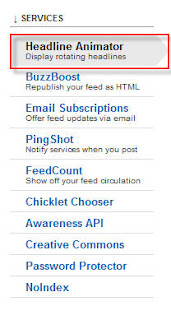
- Select "Publicize"
- Select "Headline Animator"
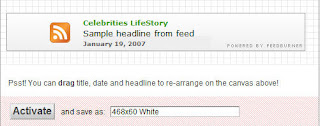
- You may edit your Headline Animator. After Editing select "Activate"
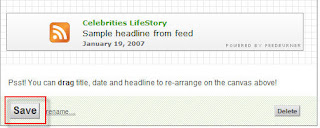
- Then select "Save"
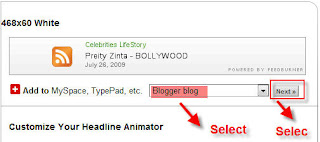
- Then choose "Blogger blog" and "Next"
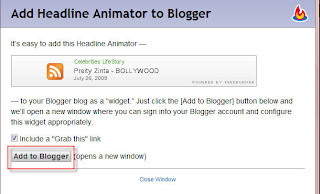
- A new window will open. Select "Add to Blogger"
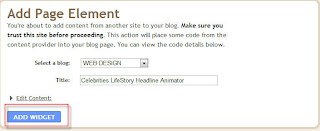
- Then a new window will open. Select "ADD WIDGET"
- You have finished. You may change the placement of your Headline Animator from your Layout



Add an Email Subscription in your Blog
Posted On Tuesday, July 28, 2009 at at 1:13 AM by RashedIt is good to add an email subscription in your blog. Almost every popular bloggers' site has email subscription option and it is good for blogging. Your site may rich with a lot of good articles. User my like them. But within tons of site they may forget your site's url or not always like to visit your site regularly because you may not updated that regularly. So let them a choice. Put an email subscription option and let them subscribe. As a result whenever you post an article they will get it without visiting your site. It is also a way to get connected with your user.
Process of adding email subscription:
- Go to http://www.feedburner.com/
- Sign Up
- Then go to again FeedBurner and Put your sites's URL and click next
- Click Next
- Click Active Feed

- Click Skip directly to feed management ( you may like to click next if you want to know about some other service)
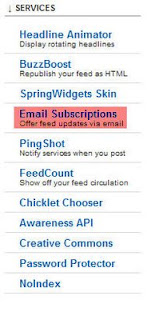
- Click Publicize
- Click Email Subscriptions
- Click Activate
- Select Language As English and Use as a widget in Blogger (see image, please). Copy the code and save
- To add email subscription in your blog; Go to Dashboard >> Layout >> Page Elements >> Add a Gadget >> HTML/JavaScript
- Then Paste the Code and Save




Add a Chat Box in Your Blogsite
Posted On at at 1:02 AM by RashedChat box is suitable for blogging site. It let the users to share their feelings and user can make funs. Sometimes they left some important informations about the site. So, blogger should add a chat box for the user. To add a chat box:
- Go to :http://www.cbox.ws/
- Sign Up
- Then after completing youe sign up process, Log in the site with your Name and Password
- Then Create your chat box. You may give a name your chatbox, change the lookings of the chatbox from "Publish! Look & Feel Options Users & Access Messages" options from the header part of the site. Make it suitable for your site and publish it.
- Then Copy the Code
- Go to your blog Dashboard or Sign in
- Then Go to Layout > > Page Elements > > Add a Gadget > > HTML/JavaScript
- Paste your ChatBox Code
- Save
You Have Finished
Animated Flash Tag Cloud For Blogger
Posted On Thursday, June 11, 2009 at at 12:29 AM by RashedFlash Tag Cloud is a cool widget. It changes the look of your Blog. It is generally known as "Blogumus"and "Blogumus" is an Flash based tag cloud widget which uses scripts converted from Roy Tanck's WP Cumulus plugin for Wordpress. There are several Difficult methods, you will find, to add it in blog. Here is how I add this in my blog.
To add Blogumus or flash Tag Cloud, follow this steps.
- Go to your Dashboard >>Layout >> Edit HTML
- Check Expand Widget Templates From the right corner of HTML code textarea
- Find out<b:section class='sidebar' id='sidebar' preferred='yes'>
Important notes:
The above code you may not find in your template code as I did not find out the exact code. Actually it is the code of column of your template. You have to find out where you want to see your Tag Cloud. If you want to see your Tag Cloud in the right column in your blog template then you have to find out the code of Right column. Column code code is not same for all template because each template designer named his template's column differently. The common Code is <div class='sidebar' id='sidebar-left'><b:section class='side' id='sidebar1' preferred='yes'> It is my template code. So please find out something like: <b:section class='...' id='.....' preferred='...'>. - Just after the code copy and paste the following code:<b:widget id='Label99' locked='false' title='Labels' type='Label'>
<b:includable id='main'>
<b:if cond='data:title'>
<h2><data:title/></h2>
</b:if>
<div class='widget-content'>
<script src='http://halotemplates.s3.amazonaws.com/wp-cumulus-example/swfobject.js' type='text/javascript'/>
<div id='flashcontent'>Blogumulus by <a href='http://www.roytanck.com/'>Roy Tanck</a> and <a href='http://www.bloggerbuster.com'>Amanda Fazani</a></div>
<script type='text/javascript'>
var so = new SWFObject("http://halotemplates.s3.amazonaws.com/wp-cumulus-example/tagcloud.swf", "tagcloud", "240", "300", "7", "#ffffff");
// uncomment next line to enable transparency
//so.addParam("wmode", "transparent");
so.addVariable("tcolor", "0x333333");
so.addVariable("mode", "tags");
so.addVariable("distr", "true");
so.addVariable("tspeed", "100");
so.addVariable("tagcloud", "<tags><b:loop values='data:labels' var='label'><a expr:href='data:label.url' style='12'><data:label.name/></a></b:loop></tags>");
so.addParam("allowScriptAccess", "always");
so.write("flashcontent");
</script>
<b:include name='quickedit'/>
</div>
</b:includable>
</b:widget> - Preview your Template and then Save Template
If you want to change the Height and Width then change this parameter:
- Width is set to 240px
- Height is set to 300px;
- Background color is white
- Test color is Grey
- Font size is "12"
Again:
If you face any trouble, Then I'm interested to hear you friends.You will not see the Tag Cloud if you have not installed the Flash Player. You can see the Tag Cloud in the Top Right Corner of my blog.
Add a "Site Search" option in your Blog
Posted On Monday, June 8, 2009 at at 1:37 AM by RashedSite search option is friendly for the users. They Can easily find out their topics through searching the site. The process of adding site search is:
- Go to Dashboard
- Then Layout >> Page Elements And then Add a Gadget
- Click HTML/JavaScript
- Copy and Paste the codes:
<form id="searchThis" action="/search" style="display:inline;" method="get"><input id="searchBox" name="q" type="text"/> <input id="searchButton" value="Go" type="submit"/></form> - Save it
You Have Finished
How to add Reaction widget in your blog?
Posted On Saturday, June 6, 2009 at at 3:17 AM by RashedTo add a reaction widget follow these steps:
- Go to Layout
- Then Edit HTML
- Check Expand Widget Templates
- Find out this code: <data:post.body/>
- Just after this code paste the following codes:
<span class='reaction-buttons'>
<b:if cond='data:top.showReactions'>
<table border='0' cellpadding='0' width='100%'><tr>
<td valign='center'><span class='reactions-label'>
<data:top.reactionsLabel/></span>
</td>
<td><iframe allowtransparency='true' class='reactions-iframe' expr:src='data:post.reactionsUrl' frameborder='0' name='reactions' scrolling='no'/></td>
</tr></table>
</b:if>
</span>
You have finished.
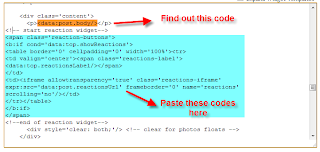
It will look like this:

Change Your Blog Template
Posted On Thursday, January 8, 2009 at at 12:16 AM by RashedI think most of the bloggers of blogger platform are not satisfied with bloggers' template. Most of them are unprofessional and not good looking. So you can change your template. Here is the process.
- Download template from internet. Search with "free blogger template". You may like to add "3 column blogger free template" or "3 column professional free blogger template". Download the template and save it in your hard drive
- Go to your Dashboard or sign in
- Go to Layout > > Edit HTML
- Download your template
- Then Click Choose File and choose your downloaded template and then click Upload
- Then there you will see a message that you are going to delete all your widget. Click Confirm and Save to change your template


You have finished. Happy blogging.
Add a Comment Box with Name, Email,URL and more
Posted On Wednesday, January 7, 2009 at at 1:56 AM by RashedYou may see it in many professional website or blog. A comment box with name, email, URL etc below the article. It is good for your user to make a user friendly good looking comment box. It will increase your traffic and good practice for SEO. (See SEO Tips). Here is the process through which you can make one.
Process Of Creating an Embeded Comment Box With Email, URL, Name field
- Go to creator.zoho
- Click Sign Up For Free
- Then in next page Click on Sign up again under Personal Free Edition
- Fill up the form and click Sign Up
- To activate your account you need to verify the link that is in your email account. Go to your email account and click the link to complete your account.
- Enter your password (that you used to sign up) and click Confirm
- Click Continue Signing In
- Then Sign In With your user name and password
- Then Click Zoho Creater from the list of services
- Create New Application
- Write "Specify Application Name:" and "Specify Form Name:" and click Create now
- We will use the Red selected items to create our comment box
- Drag Single Line in the box in right sight field and drop there. Then change the lebel name and write Name. Click Options to see more option. If you want it as a required field then Tick in the box. Otherwise left it and click Done.
- Then Drag and Drop Email and from the option Tick the Tick Box of "This is required field" and change the lebel name as Email and click Done
- Drag and Drop Multi line and change the lebel name as Comment and click done
- Then Click on More Actions and Form properties
- Change the success message, tick the verification code if you want and click Done
- Then Click Email Notification From the More Actions Dropdown Menu
- Enter your email account in To, Add a Subjects, Tick the Include user submitted data, Tick the Enabled radio button and click done.
- Click Access This Application
- Then Click Embed in Your Website from More Actions dropdown menu.
- From the header portion Click "Click here" to disable user login to Zoho and then copy the code
- You can paste this code in your website. If you want to paste in your blogger blog then go to Dashboard > > Layout > > Page elements > > Add Gadget > > HTML/JavaScript > > paste your code and Save. You can also paste it within your template.
- It Will look like:


If you like this article then subscribe with your email and get new article without visiting this site.
