JavaScript-program 2
Posted On Friday, June 12, 2009 at at 12:21 AM by RashedJavaScript is not work in all browsers. These browsers do not show
all the elements or writings within the <Script>.......</Script>
. So to make JavaScript usefull for all browsers, we have to use non script tag.
The non script tag is <!--begin hiding Javascript
and it is end with //End hiding JavaScript--> .
Actually it is comment code that hide the JavaScript from the browsers
those do not support JavaScript. Browsers that support the JavaScript language just ignore the Comment.
You can only use <!-- and end the code as //-->
Here is the Total code:
<html>
<head>
<title>JavaScript</title>
</head>
<body>
<Script Language="JavaScript">
<!--Begin hiding JavaScript
document.write("Welcome to Java World")
//End hiding JavaScript-->
</Script>
</body>
</html>
JavaScript-program 1
Posted On at at 12:17 AM by RashedHow to use JavaScript?
In the introductory post of JavaScript language, I write about
how to write the JavaScript language. Here is an elaborated part
of that post.
<html>
<head>
<title>JavaScript</title>
</head>
<body>
<Script Language="JavaScript">
document.write("Welcome to Java World")
</Script>
</body>
</html>
- Explanation
- <Script Language="JavaScript"> is used for creating JavaScript
environment. Actually it is the start of JavaScript lanuage - document.write("Welcome to Java World")
document.write is used for writing anything with JavaScript.
The syntax isdocument.write("......."). Write anything within the brackets. - There is another syntax that is used to write in JavaScript. This is
document.writeln("......."). (writeln is for write line) - </Script> is used to close the JavaScript
JavaScript
Posted On at at 12:13 AM by RashedJavaScript is developed from Java and it is more simpler than Java language.
We can use JavaScript to design webpage. JavaScript is used within HTML language.
To write JavaScript follow the following steps:
- Open NotePad or WordPad
- Write
<html>
<head>
<title>JavaScript</title>
</head>
<body>
<Script Language="JavaScript">
document.write("Welcome to Java World")
</Script>
</body>
</html> - Then Save it as JavaScript.html. Remember you have to save the program with .html extension
Animated Flash Tag Cloud For Blogger
Posted On Thursday, June 11, 2009 at at 12:29 AM by RashedFlash Tag Cloud is a cool widget. It changes the look of your Blog. It is generally known as "Blogumus"and "Blogumus" is an Flash based tag cloud widget which uses scripts converted from Roy Tanck's WP Cumulus plugin for Wordpress. There are several Difficult methods, you will find, to add it in blog. Here is how I add this in my blog.
To add Blogumus or flash Tag Cloud, follow this steps.
- Go to your Dashboard >>Layout >> Edit HTML
- Check Expand Widget Templates From the right corner of HTML code textarea
- Find out<b:section class='sidebar' id='sidebar' preferred='yes'>
Important notes:
The above code you may not find in your template code as I did not find out the exact code. Actually it is the code of column of your template. You have to find out where you want to see your Tag Cloud. If you want to see your Tag Cloud in the right column in your blog template then you have to find out the code of Right column. Column code code is not same for all template because each template designer named his template's column differently. The common Code is <div class='sidebar' id='sidebar-left'><b:section class='side' id='sidebar1' preferred='yes'> It is my template code. So please find out something like: <b:section class='...' id='.....' preferred='...'>. - Just after the code copy and paste the following code:<b:widget id='Label99' locked='false' title='Labels' type='Label'>
<b:includable id='main'>
<b:if cond='data:title'>
<h2><data:title/></h2>
</b:if>
<div class='widget-content'>
<script src='http://halotemplates.s3.amazonaws.com/wp-cumulus-example/swfobject.js' type='text/javascript'/>
<div id='flashcontent'>Blogumulus by <a href='http://www.roytanck.com/'>Roy Tanck</a> and <a href='http://www.bloggerbuster.com'>Amanda Fazani</a></div>
<script type='text/javascript'>
var so = new SWFObject("http://halotemplates.s3.amazonaws.com/wp-cumulus-example/tagcloud.swf", "tagcloud", "240", "300", "7", "#ffffff");
// uncomment next line to enable transparency
//so.addParam("wmode", "transparent");
so.addVariable("tcolor", "0x333333");
so.addVariable("mode", "tags");
so.addVariable("distr", "true");
so.addVariable("tspeed", "100");
so.addVariable("tagcloud", "<tags><b:loop values='data:labels' var='label'><a expr:href='data:label.url' style='12'><data:label.name/></a></b:loop></tags>");
so.addParam("allowScriptAccess", "always");
so.write("flashcontent");
</script>
<b:include name='quickedit'/>
</div>
</b:includable>
</b:widget> - Preview your Template and then Save Template
If you want to change the Height and Width then change this parameter:
- Width is set to 240px
- Height is set to 300px;
- Background color is white
- Test color is Grey
- Font size is "12"
Again:
If you face any trouble, Then I'm interested to hear you friends.You will not see the Tag Cloud if you have not installed the Flash Player. You can see the Tag Cloud in the Top Right Corner of my blog.
Add a "Site Search" option in your Blog
Posted On Monday, June 8, 2009 at at 1:37 AM by RashedSite search option is friendly for the users. They Can easily find out their topics through searching the site. The process of adding site search is:
- Go to Dashboard
- Then Layout >> Page Elements And then Add a Gadget
- Click HTML/JavaScript
- Copy and Paste the codes:
<form id="searchThis" action="/search" style="display:inline;" method="get"><input id="searchBox" name="q" type="text"/> <input id="searchButton" value="Go" type="submit"/></form> - Save it
You Have Finished
How to add Reaction widget in your blog?
Posted On Saturday, June 6, 2009 at at 3:17 AM by RashedTo add a reaction widget follow these steps:
- Go to Layout
- Then Edit HTML
- Check Expand Widget Templates
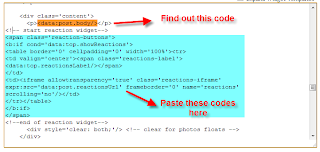
- Find out this code: <data:post.body/>
- Just after this code paste the following codes:
<span class='reaction-buttons'>
<b:if cond='data:top.showReactions'>
<table border='0' cellpadding='0' width='100%'><tr>
<td valign='center'><span class='reactions-label'>
<data:top.reactionsLabel/></span>
</td>
<td><iframe allowtransparency='true' class='reactions-iframe' expr:src='data:post.reactionsUrl' frameborder='0' name='reactions' scrolling='no'/></td>
</tr></table>
</b:if>
</span>
You have finished.

It will look like this:

