


Add Signature to your Blogger Post
Posted On Monday, December 29, 2008 at at 12:48 AM by RashedIf you want to see your signature after each posts of your blog then follow the process:
- Create a signature, signature should be an image. You can make an image signature with GIMP
- upload it in a server. Here you can upload it ripway or photobucket
- Go to Dashboard > > Settings > > Formatting > > Post Template
- Write this code in Post Template box: <p> <image class="centered"alt="post signature" src="SIGNATURE URL" /> </p>
- Change "SIGNATURE URL" with your signature URL
Add All Posts Widget or Table Of Content Widget
Posted On Friday, December 26, 2008 at at 4:06 PM by RashedIf you are a blogger and you are blogging for a long time then you will find that your site is carrying a lot of pages with a lot of title. The lebel gadget or recent posts are not displaying all the articles name. It will be better for your user if they can see your all posts. You can sort the TOC by Post Title by clicking the column header. Click it again, and it is sorted in reversed order. The same way if you want to sort the posts by date: newest first, or oldest first. And by clicking on one of the labels in the TOC filters all posts with that label. Click the column header to return to the full TOC. I think it is good for SEO and it will increase your traffic because it will make your site user friendly.
Here is how to install it to your Blog.
- Back Up your Template.
- Add a HTML Page Element
- Go to Layout < < Add a gadget and then Add a HTML page element above your Blog Posts element.
Leave the title blank. Add the following html: - Save your template.
- Add a Sidebar HTML-element
- Add custom styles to the skin of your template.
- For your convenience: Beautiful Beta uses the following styling:

Edit your template in HTML-mode, and look for the <b:section> with id=main. This is the section that holds the Blog posts.

Change that line as follows:
<b:section class='main' id='main' maxwidgets='2' showaddelement='yes'>

Save the template and switch to the Page Elements Tab.


<div id="toc"></div>
Now add a HTML-element to the sidebar. Set the title to "TOC".
For the contents, enter:
<div id="toclink"><a href="javascript:showToc();">Show TOC</a><br/><br/></div><script style="text/javascript" src="http://home.planet.nl/~hansoosting/downloads/blogtoc.js"></script><script src="http://YOURBLOG.blogspot.com/feeds/posts/default?alt=json-in-script&max-results=999&callback=loadtoc"></script>
Replace YOURBLOG with the name of Your Site's URL...... exactly.
Oh yes, and save.
New id's and classes are:
#toc : the div-wrapper that contains the TOC
.toc-header-col1 : header of column 1
.toc-header-col2 : header of column 2
.toc-header-col3 : header of column 3
.toc-entry-col1 : cell in column 1
.toc-entry-col2 : cell in column 2
.toc-entry-col3 : cell in column 3
<style type="text/css">#toc { border: 0px solid #000000; background: #ffffff; padding: 5px; width:500px; margin-top:10px;}.toc-header-col1, .toc-header-col2, .toc-header-col3 { background: #ffd595; color: #000000; padding-left: 5px; width:250px;}.toc-header-col2 { width:75px;}.toc-header-col3 { width:125px;}.toc-header-col1 a:link, .toc-header-col1 a:visited, .toc-header-col2 a:link, .toc-header-col2 a:visited, .toc-header-col3 a:link, .toc-header-col3 a:visited { font-size:80%; text-decoration:none;}.toc-header-col1 a:hover, .toc-header-col2 a:hover, .toc-header-col3 a:hover { font-size:80%; text-decoration:underline;}.toc-entry-col1, .toc-entry-col2, .toc-entry-col3 { padding-left: 5px; font-size:70%;}</style> |
You can add this code to the <b:skin>-part of the template, or insert it in the sidebar widget.
Add Label Cloud
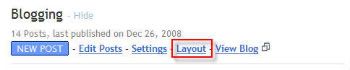
Posted On at at 3:26 PM by RashedTo add a lebel cloud flow this process:
- Go to your Dashboard
- Select Layout
- G to Edit HTML
- Find out this code:
]]></b:skin> And Place Below Code In place of ]]></b:skin>(By Removing ]]></b:skin>)
/* Label Cloud Styles
----------------------------------------------- */
#labelCloud {text-align:center;font-family:arial,sans-serif;}
#labelCloud .label-cloud li{display:inline;background-image:none !important;padding:0 5px;margin:0;vertical-align:baseline !important;border:0 !important;}
#labelCloud ul{list-style-type:none;margin:0 auto;padding:0;}
#labelCloud a img{border:0;display:inline;margin:0 0 0 3px;padding:0}
#labelCloud a{text-decoration:none}
#labelCloud a:hover{text-decoration:underline}
#labelCloud li a{}
#labelCloud .label-cloud {}
#labelCloud .label-count {padding-left:0.2em;font-size:9px;color:#000}
#labelCloud .label-cloud li:before{content:"" !important}
]]></b:skin>
<script type='text/javascript'>
// Label Cloud User Variables
var cloudMin = 1;
var maxFontSize = 20;
var maxColor = [0,0,255];
var minFontSize = 10;
var minColor = [0,0,0];
var lcShowCount = false;
</script> - Save your template
- Go to Edit HTML and Find these code:
- Atlast replace the above mention Label1 widget code with below code:


<b:widget id=’Label1′ locked=’false’ title=’Labels’ type=’Label’/>
(if you don't find it then go to page element and add a Lebel Gadget from add a gadget)
<b:widget id='Label1' locked='false' title='Label Cloud' type='Label'> <b:includable id='main'> <b:if cond='data:title'> <h2><data:title/></h2> </b:if> <div class='widget-content'> <div id='labelCloud'/> <script type='text/javascript'> // Don't change anything past this point ----------------- // Cloud function s() ripped from del.icio.us function s(a,b,i,x){ if(a>b){ var m=(a-b)/Math.log(x),v=a-Math.floor(Math.log(i)*m) } else{ var m=(b-a)/Math.log(x),v=Math.floor(Math.log(i)*m+a) } return v } var c=[]; var labelCount = new Array(); var ts = new Object; <b:loop values='data:labels' var='label'> var theName = "<data:label.name/>"; ts[theName] = <data:label.count/> </b:loop> for (t in ts){ if (!labelCount[ts[t]]){ labelCount[ts[t]] = new Array(ts[t]) } } var ta=cloudMin-1; tz = labelCount.length - cloudMin; lc2 = document.getElementById('labelCloud'); ul = document.createElement('ul'); ul.className = 'label-cloud'; for(var t in ts){ if(ts[t] < cloudMin){ continue; } for (var i=0;3 > i;i++) { c[i]=s(minColor[i],maxColor[i],ts[t]-ta,tz) } var fs = s(minFontSize,maxFontSize,ts[t]-ta,tz); li = document.createElement('li'); li.style.fontSize = fs+'px'; li.style.lineHeight = '1'; a = document.createElement('a'); a.title = ts[t]+' Posts in '+t; a.style.color = 'rgb('+c[0]+','+c[1]+','+c[2]+')'; a.href = '/search/label/'+encodeURIComponent(t); if (lcShowCount){ span = document.createElement('span'); span.innerHTML = '('+ts[t]+') '; span.className = 'label-count'; a.appendChild(document.createTextNode(t)); li.appendChild(a); li.appendChild(span); } else { a.appendChild(document.createTextNode(t)); li.appendChild(a); } ul.appendChild(li); abnk = document.createTextNode(' '); ul.appendChild(abnk); } lc2.appendChild(ul); </script> <noscript> <ul> <b:loop values='data:labels' var='label'> <li> <b:if cond='data:blog.url == data:label.url'> <data:label.name/> <b:else/> <a expr:href='data:label.url'><data:label.name/></a> </b:if> (<data:label.count/>) </li> </b:loop> </ul> </noscript> <b:include name='quickedit'/> </div> </b:includable> </b:widget> |
You have finished
Change Title of Your Each Post
Posted On at at 12:57 PM by RashedBe ready to change your title accordingly to your posts.It means you can now have a unique title for each and every post now.This will really help your blogs ranking and it will help you for your blogs Search Engine Optimization. You should be creative so that you will get best result out of it.
Process
- Goto Blogger Dashboard>>Layout>>Edit Html
- Backup your template
- Follow the instructions
- Find these codein your XML template{in header part}:
<title><data:blog.pagetitle/></title>


Replace the Code With these Codes:
<!-- Start Widget-based: Changing the Blogger Title Tag --> <b:if cond='data:blog.pageType == "item"'> <b:section id='titleTag'> <b:widget id='Blog2' locked='false' title='Blog Posts' type='Blog'> <b:includable id='comments' var='post'/> <b:includable id='postQuickEdit' var='post'/> <b:includable id='main' var='top'><title><b:loop values='data:posts' var='post'><b:include data='post' name='post'/></b:loop> ~ <data:blog.title/></title></b:includable> <b:includable id='backlinkDeleteIcon' var='backlink'/> <b:includable id='feedLinksBody' var='links'/> <b:includable id='backlinks' var='post'/> <b:includable id='status-message'/> <b:includable id='feedLinks'/> <b:includable id='nextprev'/> <b:includable id='commentDeleteIcon' var='comment'/> <b:includable id='post' var='post'><data:post.title/></b:includable> </b:widget> </b:section> <b:else/> <title><data:blog.pageTitle/></title> </b:if> <!-- End Widget-based: Changing the Blogger Title Tag --> |
You can also add a very good keyword in homepage's title by just adding Keyword + Blog Title by finding this line in the above code(3rd last)-
<b:else/>
<title><data:blog.pageTitle/></title>
</b:if>
and adding keyword here
<b:else/>
<title> <data:blog.pageTitle/>Keyword</title>
</b:if>
Ok....You have now done this
Add Recent Posts Widget
Posted On at at 5:30 AM by RashedCreate Recent Posts Widget. It will help your reader. They will able to know the recent posts. Follow the process to Get the Recent Posts widget.
- Sign in your site ant go to layout>>Page Elements>>Add a Gadget.
- Select HTML/Javascript
- Copy and paste these codes:<script style="text/javascript" src="http://scraptoall.googlepages.com/recentposts.js"></script><script style="text/javascript">var numposts = 10;var showpostdate = false;var showpostsummary = false;var numchars = 100;var standardstyling = true;</script><script src="http://shortmemory-shorttime.blogspot.com/feeds/posts/default?orderby=published&alt=json-in-script&callback=showrecentposts"></script>
- Change the url ("http://shortmemory-shorttime.blogspot.com/) and write your site's URL
- Save the gadget.
SEO Tips-Great Tips for Bloggers
Posted On at at 2:06 AM by RashedSEO TIPS
What is SEO?
According to wikipaedia
Search engine optimization (SEO) is the process of improving the volume and quality of traffic to a web site from search engines via "natural" ("organic" or "algorithmic") search results. Usually, the earlier a site is presented in the search results, or the higher it "ranks," the more searchers will visit that site. SEO can also target different kinds of search, including image search, local search, and industry-specific vertical search engines.
SEO Tips
Here are some great SEO tips:
Find The Best Keywords:
Keywords are those that a user use to search a topic. Use the best keywords otherwise
it would be a waste of your time to optimize your website. To find out the best keywords you should spend some time. There are many SEO tools available on the Internet to help you find the best keywords. You can use these two popular Software from here.Make Title With Keywords:
Insert keywords that is used in your meta tag within the title tag so that search engine robots will know what your page is about. The title tag is located right at the top of your document within the head tags. If you are a blogger then you will see it while you are writing your article. Inserting a keyword or key phrase will greatly improve your chances of bringing targeted traffic to your site. It is a good practice for bloggers.
Link With Your Keywords:
If your site contains a lot of pages then use the same keywords as anchor text to link to the page from other pages on your site.The more linked keywords the more better.Use Title Text Within The Body:
You should use the title text within the body of the page. It will let your users to know that they are in the right page. It is good for bloggers to make the keywords bold. A good blogging site should not contain more than 5 same keywords within the same topics.Make Different Title for Different Page:
Do not use the exact same title tag on every page on your website. You should know that search engine robots are crawling your site continuesly and it might determine that all your pages are the same. As a result your pages might not get indexed.Create meta Tags
meta tags are hidden code. It is written within the <head>....</head> tags. search engine read the meta tags. It is very much important for webmasters to increase their site rank.
See how to add META TAGCreate a Site Map:
PageRank is relative and shared throughout a website by a unique voting system created by Google. I could spend two days trying to explain how PageRank works, but what it comes down to is having efficient navigation throughout your site. That where a site map page comes in. Since every page on the website will be linked to the sitemap, it allows webcrawlers (and users) to quickly and easily find content. This SEO tip is one of my favorite of top 10 SEO tips.
See how to create a SITEMAPUse alt tag for Image:
Use alt tag for your site's images. This will help search engines that index images to find your pages and will also help readers who use text only web browsers. You should keep in mind that not everyone is searching text, a lot of people are seeing images. alt tag will help you to let them find your images.Submit Your Site in Different Search Engine:
Submit your site in different search engines by yourself. Do not use a submission service or submission software. Doing so could get your site penalized or even banned.Submit your site in:
Submit your Site in Different Directories:
Through submitting your site in different directories you can get traffic and it is a good SEO trics. Here are a list of directories. You can more through searching the internet.Some Web Directories:
Some Blog Directories:

Create a Blog
Posted On Wednesday, December 24, 2008 at at 12:30 AM by RashedWhat is Blog?
According to wikipedia
A blog (a contraction of the term "Web log") is a Web site, usually maintained by an individual with regular entries of commentary, descriptions of events, or other material such as graphics or video. Entries are commonly displayed in reverse-chronological order. "Blog" can also be used as a verb, meaning to maintain or add content to a blog.
Process of Creating a Blog
If you want to create a blog then the 1st thing is that where you want to create it. There are a lot of free blog site where you can start blogging.Blogger and WordPress are two popular Blog site. Here I will describe how to start Blogging with Blogger Site. The process is going here:
- Create an email account if you have not one. Click gmail to create a account. (gmail is best for Blogger's Blog)
- Go to http://www.blogger.com
- Put your email account under username textfield (1), password under password textfield (2) and then click SIGN IN (3)
- Enter your Blog title in Blog title textfield (1), then enter blog address (your sites URL) and Check Availability (2). Then enter the words that is provided by the sites (3) and click CONTINUE (4).
- Choose a template (1) and click CONTINUE (2)
- Click START BLOGGING to start your blog. You have done it.


Types of Blog
According to wikipedia
There are many different types of blogs, differing not only in the type of content, but also in the way that content is delivered or written.
Personal Blogs:
The personal blog, an ongoing diary or commentary by an individual, is the traditional, most common blog. Personal bloggers usually take pride in their blog posts, even if their blog is never read by anyone but them. Blogs often become more than a way to just communicate; they become a way to reflect on life or works of art. Blogging can have a sentimental quality. Few personal blogs rise to fame and the mainstream, but some personal blogs quickly garner an extensive following. A type of personal blog is referred to as "microblogging," which is extremely detailed blogging as it seeks to capture a moment in time. Sites, such as Twitter, allow bloggers to share thoughts and feelings instantaneously with friends and family and is much faster than e-mailing or writing. This form of social media lends to an online generation already too busy to keep in touch.
Corporate Blogs:
A blog can be private, as in most cases, or it can be for business purposes. Blogs, either used internally to enhance the communication and culture in a corporation or externally for marketing, branding or public relations purposes are called corporate blogs.
Question Blogging:
Question Blogging is a type of blog that answers questions. Questions can be submitted in the form of a submittal form, or through email or other means such as telephone or VOIP. Qlogs can be used to display shownotes from podcasts or the means of conveying information through the internet. Many question logs use syndication such as RSS as a means of conveying answers to questions.
By Media Type:
A blog comprising videos is called a vlog, one comprising links is called a linklog, a site containing a portfolio of sketches is called a sketchblog or one comprising photos is called a photoblog. Blogs with shorter posts and mixed media types are called tumblelogs.
A rare type of blog hosted on the Gopher Protocol is known as a Phlog.
By Device:
Blogs can also be defined by which type of device is used to compose it. A blog written by a mobile device like a mobile phone or PDA could be called a moblog. One early blog was Wearable Wireless Webcam, an online shared diary of a person's personal life combining text, video, and pictures transmitted live from a wearable computer and EyeTap device to a web site. This practice of semi-automated blogging with live video together with text was referred to as sousveillance. Such journals have been used as evidence in legal matters.
By Genre:
Some blogs focus on a particular subject, such as political blogs, travel blogs, house blogs, fashion blogs, project blogs, education blogs, niche blogs, classical music blogs, quizzing blogs and legal blogs (often referred to as a blawgs) or dreamlogs. While not a legitimate type of blog, one used for the sole purpose of spamming is known as a Splog.
What Can You do With a Blog?
We can do a lot of things through our blog. It depends on who is blogging. We can express our thoughts, our opinion. We can use it for our company's publishing activity. We can also earn from our blog. In a word we can do what a website can do with a blog.
Add your URL to Yahoo
Posted On Monday, December 22, 2008 at at 4:22 AM by RashedYahoo is one of the most popular search engine. You should Add your site's URL here. It will help you to increase your traffic as well as your SEO rank. To add your site's URL, follow this process:
- Go to http://search.yahoo.com/info/submit.html
You will see here alot of services that yahoo provides. Click Submit Your Site for Free: - Click Submit a Website or Webpage
- Then write your site's URL in the text field (1) and click Submit URL button(2)


You will get a Thank you confirmation after successfully adding your site's URL and that will look like this:
Add your URL to Google
Posted On at at 3:29 AM by RashedAdd your site's URL to Google search engine. It will help you to increase your traffic. To add your site just follow the process below:
- Go to http://www.google.com/addurl/?continue=/addurl
- Write your URL in URL text field (1)
Please enter your full URL, including the http:// prefix. For example: http://blogging-for-bloggers.blogspot.com/ - Write comments in Comments text field (2)
Add your comments or keywords that describe the content of your page. These are used only for Google's information and do not affect how your page is indexed or used by Google. - Enter the squiggly letters those are shown in the page. It will help Google to identify in which way your site is added (automatically entered by software robots or submitted by individuals).(3)
- Then click Add URL button (4)

Please note: Only the top-level page from a host is necessary; you do not need to submit each individual page. Our crawler, Googlebot, will be able to find the rest. Google updates its index on a regular basis, so updated or outdated link submissions are not necessary. Dead links will 'fade out' of our index on our next crawl when we update our entire index.
After your site submission you will get a thank you confirmation like this:

Add Navigation Button in Your Blog
Posted On Sunday, December 21, 2008 at at 5:46 PM by RashedWhy You Need Button?
You should create button if you have a site that contains a lot of data on various topics.
It will help your user to navigate your site easily. But most of the bloggers face problems while they use template
from other source. Some templates contain navigation button but most good looking templates do not contain it.
So I was trying to make it possible for bloggers and atlast I found it. It is so easy. You can change the codes and
make it as you like. Here no background image is used. If you want button with background image then wait a few days and
I will deliver you the process.
Style code used for Button:
a.navigation {
background: #000000;
color: #ffffff;
margin: 1px;
padding: 5px 35px 5px 5px;
border-width: 0;
text-transform: uppercase;
text-decoration: none;
font-weight: bold;
}
a.navigation:hover {
background: #5d5d54;
text-decoration: none;
}
Button link codes:
<a class="navigation" href="http://your-link-url.blogspot.com">HOME</a>
<a class="navigation" href="http://your-link-url.blogspot.com">PICTURE</a>
<a class="navigation" href="http://your-link-url.blogspot.com">ABOUT ME</a>
Process Of Adding Button
Here is the detail process:
- Go to your Dashboard
Go to Layout and then Edit HTML - Find <b:skin> and </b:skin> tags in your template. You will find it in your Templates Style section or just use Ctrl+F to find out it.
- Then copy and paste these codes within these <b:skin> and </b:skin> (1) tags and save template (2):
a.navigation {
background: #000000;
color: #ffffff;
margin: 1px;
padding: 5px 35px 5px 5px;
border-width: 0;
text-transform: uppercase;
text-decoration: none;
font-weight: bold;
}
a.navigation:hover {
background: #5d5d54;
text-decoration: none;
}
Process of Adding Style code used for Button


You will see that there are two statements in this styling: the first statement defines (a.navigation) what the buttons will look
like as they appear in your blog and the second (a.navigation:hover) statement defines the background color of
the button when you place your cursor over the button (the "mouseover" effect).
If you you want to change button style then you can change the color code of the backgrounds to colors which you
prefer for your blog. You can easily find and see 350+ color codes from here.
- After saving your template Go to Page Elements >Add a Gadget
- Select HTML/JavaScript
- Copy and paste these code (1) and then click save (2):
<a class="navigation" href="http://your-link-url.blogspot.com">HOME</a>
<a class="navigation" href="http://your-link-url.blogspot.com">PICTURE</a>
<a class="navigation" href="http://your-link-url.blogspot.com">ABOUT ME</a>
Process of Adding Button link codes:
Create your links in an HTML/Javascript widget


Make sure to replace "http://your-link-url.blogspot.com"
with the URL of the post page (or link) and replace the link text (eg: HOME) with the text you would like to display.
It will look like:
Change Blogger's Header Picture
Posted On Monday, December 15, 2008 at at 12:37 AM by RashedMake your blogsite's header picture as you like. To change your header picture:
- Go to Dashboard or Sign in your site
- Click Layout from your Dashboard
- Select Page Elements (it is remain as default).
- Click "Edit" of your site's Header element
- Browse a picture from your computer or paste your picture's URL
- Select Radio button of Placement. (default is Behind title and description)
- Then click Save


350+ Color Code
Posted On at at 12:19 AM by RashedWhat is Color Code?
Use of Color Code
103 Color Code
More 250+ popular Color Codes For Blogger
What is Color Code?
We see a lot of colors. We see Green, Yellow, Red, White and a lot of colors around here. But when we want to work with color
then how many name we can recall. There is also a problem with color mixer. You can not always give them a name. So, what can
you do. You can use Color Code. Color Code is used instead of Color name. As example: we can use #ffffff for white, #00ffff for aqua or #oooooo
for black. These codes are hexadecimal code and used for Color.
Use of Color Code
You can use color code for:
- Change your templates Color as
- Background color
- Font color
- Link color etc
103 Color Code
| aliceblue Code: #f0f8ff | antiquewhite Code: #faebd7 | aqua Code: #00ffff | aquamarine Code: #7fffd7 |
| azure Code: #f0ffff | beige Code: #f5f5dc | bisque Code: #ffe4c4 | black Code: #000000 |
| blanchedalmond Code: #ffabcd | blue Code: #0000ff | blueviolet Code: #8a2be2 | brown Code: #a52a2a |
| burlywood Code: #deb887 | cadetblue Code: #5f9ea0 | chartreuse Code: #7fff00 | cholocate Code: #d2691e |
| coral Code: #ff7f50 | cornflowerblue Code: #6495ed | cornsilk Code: #fff8dc | crimson Code: #dc143c |
| cyan Code: #00ffff | darkblue Code: #00008b | darkcyan Code: #008b8b | darkgoldenrod Code: #b8860b |
| darkgray Code: #a9a9a9 | darkgreen Code: #006400 | darkkhaki Code: #bdb76b | darkmagenta Code: #8b008b |
| darkolivegreen Code: #556b2f | darkorange Code: #ff8c00 | darkorchid Code: #9932cc | darkred Code: #8b0000 |
| darksalmon Code: #e9967a | darkseagreen Code: #8fbc8f | darkslateblue Code: #483D8b | darkslategray Code: #2f4f4f |
| darkturquoise Code: #00ced1 | darkviolet Code: #9400d3 | deeppink Code: #ff1493 | deepskyblue Code: #00bfff |
| dimgray Code: #696969 | dodgerblue Code: #1e90ff | firebrick Code: #b22222 | floralwhite Code: #fffaf0 |
| forestgreen Code: #228b22 | fuchsia Code: #ff00ff | gainsboro Code: #dcdcdc | ghostwhite Code: #f8f8ff |
| gold Code: #ffd700 | goldenrod Code: #daa520 | gray Code: #808080 | green Code: #008000 |
| greenyellow Code: #adff2f | honeydew Code: #f0fff0 | hotpink Code: #ff69b4 | indianred Code: #cd5c5c |
| indigo Code: #4b0082 | ivory Code: #fffff0 | khaki Code: #f0e68c | lavender Code: #e6e6fa |
| lavenderblush Code: #fff0f5 | lemonchiffon Code: #fffacd | lightblue Code: #add8e6 | lightcoral Code: #f08080 |
| lightcyan Code: #e0ffff | lightgoldenrodyellow Code: #fafad2 | lightgreen Code: #90ee90 | lightgrey Code: #d3d3d3 |
| lightpink Code: #ffb6c1 | lightsalmon Code: #ffa07a | lightseagreen Code: #20b2aa | lightskyblue Code: #87cefa |
| lightslategrey Code: #778899 | lightsteelblue Code: #b0c4de | lightyellow Code: #ffffe0 | lime Code: #00ff00 |
| limegreen Code: #32cd32 | linen Code: #faf0e6 | magenta Code: #ff00ff | maroon Code: #800000 |
| mediumaquamarine Code: #66cdaa | mediumblue Code: #0000cd | mediumorchid Code: #ba55d3 | mediumpurple Code: #9370db |
| mediumseagreen Code: #3cb371 | mediumslateblue Code: #7b68ee | mediumspringgreen Code: #00fa9a | mediumturquoise Code: #48d1cc |
| mediumvioletred Code: #c71585 | midnightblue Code: #191970 | mintcream Code: #f5fffa | mistyrose Code: #ffe4e1 |
| navajowhite Code: #ffdead | navy Code: #000080 | oldlace Code: #fdf5e6 | olive Code: #800080 |
| olivedred Code: #6b8e23 | orange Code: #ffa500 | orangered Code: #ff4500 | orchid Code: #da70d6 |
| palegoldenrod Code: #eee8a4 | plateurquoise Code: #afeeee | palevioletred Code: #db7093 | papayawhip Code: #ffefd5 |
| aqua Code: #00ffff | peachpuff Code: #ffdab9 | peru Code: #cd853f | pink Code: #ffc0cb |
| plum Code: #dda0dd | powderblue Code: #b0e0e6 | purple Code: #800080 | red Code: #ff0000 |
| rosybrown Code: #bc8f8f | royalblue Code: #4169e1 | saddlebrown Code: #8b4513 | salmon Code: #fa8072 |
| sandybrown Code: #f4a460 | seagreen Code: #2e8b57/td> | seashell Code: #fff5ee | sienna Code: #a0522d |
| silver Code: #c0c0c0 | skyblue Code: #87ceeb | slateblue Code: #6a5acd | slategray Code: #708090 |
| snow Code: #fffafa | springgreen Code: #00ff7f | steelblue Code: #4682b4 | tan Code: #d2b48c |
| teal Code: #008080 | thistle Code: #d8bfd8 | tomato Code: #ff6347 | turqoise Code: #40e0d0 |
| violet Code: #ee82ee | Wheat Code: #f5deb3 | white Code: #ffffff | whitesmoke Code: #f5f5f5 |
| yellow Code: #ffff00 | yellowgreen Code: #9acd32 |
More 250+ popular Color Codes For Blogger
| #000000 | #000033 | #000066 | #000099 |
| #0000cc | #0000ff | #003300 | #003366 |
| #003399 | #0033cc | #0033ff | #006600 |
| #006633 | #006666 | #006699 | #0066cc |
| #0066ff | #009900 | #009933 | #009966 |
| #009999 | #0099cc | #0099ff | #330000 |
| #330033 | #330066 | #330099 | #3300cc |
| #3300ff | #333300 | #333333 | #333366 |
| #333399 | #3333cc | #3333ff | #336600 |
| #336633 | #336666 | #336699 | #3366cc |
| #3366ff | #339900 | #339933 | #339966 |
| #339999 | #3399cc | #3399ff | #33cc00 |
| #33cc33 | #33cc66 | #33cc99 | #33cccc |
| #33ccff | #33ff00 | #33ff33 | #33ff66 |
| #33ff99 | #33ffcc | #33ffff | #660000 |
| #660033 | #660066 | #660099 | #6600cc |
| #6600ff | #663300 | #663333 | #663366 |
| #663399 | #6633cc | #6633ff | #666600 |
| #666633 | #666666 | #666699 | #6666cc |
| #6666ff | #669900 | #669933 | #669966 |
| #669999 | #6699cc | #6699ff | #66cc00 |
| #66cc33 | #66cc66 | #66cc99 | #66cccc |
| #66ccff | #66ff00 | #66ff33 | #66ff66 |
| #66ff99 | #66ffcc | #66ffff | #990000 |
| #990033 | #990066 | #990099 | #9900cc |
| #9900ff | #993300 | #993333 | #993366 |
| #993399 | #9933cc | #9933ff | #996600 |
| #996633 | #996666 | #996699 | #9966cc |
| #9966ff | #999900 | #999933 | #999966 |
| #999999 | #9999cc | #9999ff | #99cc00 |
| #99cc33 | #99cc66 | #99cc99 | #99cccc |
| #99ccff | #99ff00 | #99ff33 | #99ff66 |
| #99ff99 | #99ffcc | #99ffff | #cc0000 |
| #cc0033 | #cc0066 | #cc0099 | #cc00cc |
| #cc00ff | #cc3300 | #cc3333 | #cc3366 |
| #cc3399 | #cc3399 | #cc33ff | #cc6600 |
| #cc6633 | #cc6666 | #cc6699 | #cc66cc |
| #cc66ff | #cc9900 | #cc9933 | #cc9966 |
| #cc9999 | #cc99cc | #cc99ff | #cccc00 |
| #cccc33 | #cccc66 | #cccc99 | #cccccc |
| #ccccff | #ccff00 | #ccff33 | #ccff66 |
| #ccff99 | #ccffcc | #ccffff | #ff0000 |
| #ff0033 | #ff0066 | #ff0099 | #ff0099 |
| #ff00ff | #ff3300 | #ff3333 | #ff3366 |
| #ff3399 | #ff33cc | #ff33ff | #ff6600 |
| #ff6633 | #ff6666 | #ff6699 | #ff66cc |
| #ff66ff | #ff9900 | #ff9933 | #ff9966 |
| #ff9999 | #ff99cc | #ff99ff | #ffcc00 |
| #ffcc00 | #ffcc66 | #ffcc99 | #ffcccc |
| #ffccff | #ffff00 | #ffff33 | #ffff66 |
| #ffff99 | #ffffcc | #ffffff | Thanks |
Add Icon Before Your Post Title
Posted On Saturday, December 13, 2008 at at 1:54 AM by RashedYou can Add Icon before or After your posts. If you want then follow the instruction.
Step 1:
- Create your Icon or Download it from Internet
- Upload it in any server. You can find a lot of free server like Photobucket
- copy the icon URL
Copy your icon url:

Step 2:
- Go to your Dashboard or Sign in your blog
- Click Layout and then Edit HTML


- Find out this code: <b:if cond='data:post.url'> or Find out: <a expr:href='data:post.url'> <data:post.title/</a>
- Write: <img src=" your Image Url " /> after <b:if cond='data:post.url'> (if you want to add icon before your post)
- Or Write: <img src=" your Image Url " /> after <a expr:href='data:post.url'> <data:post.title/</a> (if you want to add icon after your post)


- Then SAVE TEMPLATE
- It will look like this:

Create Snow Effect for your Blog
Posted On Friday, December 12, 2008 at at 4:19 AM by RashedThis is a widget and it is very easy to create. Just add your blog URL and get the effect.
Get your Snow Effect |
Snow effect looks good in black background color template. This widget is made Kurt Grigg.
